CIS New Installation
Description: Below are quick instructions for environment setup and installation of F5 CIS and F5 BIG-IP for load balancing and securing traffic into your Kubernetes cluster. For a full guide to these topics, please refer to the official documentation on Clouddocs .
BIG-IP Configuration
Confirm below requirements for deploying CIS
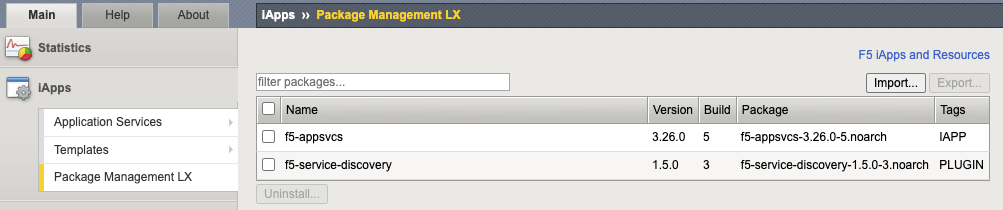
AS3 is an extension that allows configuration via declarative API. Version 3.18+ must be installed on your BIG-IP system. Download the rpm file from F5 Networks GitHub. Login to BIG-IP GUI > iApps > Package Management LX > Click “Import…”.
Create a BIG-IP partition to manage Kubernetes objects. This partition can be created either via the GUI (System > Users > Partition List) or via our TMOS CLI:
create auth partition <cis_managed_partition>Create a user on BIG-IP with admin access. Login to BIG-IP GUI > System > Users > Click “Create…” > Set password > For Partition Access, select Administrator for Role > Click “Add” > Click “Finished”.
For Cluster mode integration using BGP, confirm that you have the “Routing Bundle” that enables use of zebos.
[admin@ip-10-1-1-5:Active:Standalone] ~ # tmsh show sys license | grep -i routing
    Routing Bundle, VE

[admin@ip-10-1-1-5:Active:Standalone] ~ # zebos check
=== route domain: 0 ===
nsm is running [23183]
imi is running [23182]
bgpd is running [23184]
BIG-IP Optimizations (Optional)
If you have a large cluster or expect to have many Kubernetes tenants, namespaces and app workloads that need to be exposed on BIG-IP, make below optimizations on BIG-IP to support the increased control plane calls.
Log into BIG-IP as administrator and make below changes:
# https://my.f5.com/manage/s/article/K13996055

tmsh modify sys db provision.extramb value 2048

tmsh modify sys db restjavad.useextramb value true

tmsh modify sys db provision.restjavad.extramb value 1600

tmsh save sys config

curl -s -f -u admin -H "Content-Type: application/json" -d '{"maxMessageBodySize":134217728}' -X POST http://localhost:8100/mgmt/shared/server/messaging/settings/8100

# https://my.f5.com/manage/s/article/K52650034
sysctl -w net.netfilter.nf_conntrack_tcp_timeout_time_wait=30
CIS Installation in Kubernetes
Create secret used for authentication to F5 BIG-IP from CIS.
kubectl create secret generic bigip-login -n kube-system --from-literal=username=cis_usr --from-literal=password=XXXCreate service account
kubectl create serviceaccount bigip-ctlr -n kube-systemCreate cluster role binding for the service account
kubectl create clusterrolebinding k8s-bigip-ctlr-clusteradmin --clusterrole=cluster-admin --serviceaccount=kube-system:bigip-ctlrCreate service account
kubectl create serviceaccount bigip-ctlr -n kube-system(Optional) Create secret containing repository credentials. Modify registry as needed
kubectl create secret generic f5-docker-images --from-file=.dockerconfigjson=/root/.docker/config.json --type=kubernetes.io/dockerconfigjson -n kube-systemDefine deployment for CIS. Note: Below manifest will use Cluster mode, watch all namespaces (default), output debug messages (can change to info as needed), work for IPv4 only environment, and pulls the latest image from docker (you can change to your local registry).
apiVersion: apps/v1
kind: Deployment
metadata:
  name: k8s-bigip-ctlr-deployment
  namespace: kube-system
spec:
  replicas: 1
  selector:
    matchLabels:
      app: k8s-bigip-ctlr
  strategy:
    type: RollingUpdate
  template:
    metadata:
      labels:
        app: k8s-bigip-ctlr
      name: k8s-bigip-ctlr
    spec:
      serviceAccountName: bigip-ctlr
      containers:
        - args:
            - --bigip-username=$(BIGIP_USERNAME)
            - --bigip-password=$(BIGIP_PASSWORD)
            - --bigip-url=<ip_address-or-hostname>
            - --bigip-partition=k8s
            - --pool-member-type=cluster
            - --insecure=true
            - --agent=as3
            - --log-level=info
            - --custom-resource-mode=true
            - --log-as3-response=true
            - --as3-validation=true
          command:
            - /app/bin/k8s-bigip-ctlr
          env:
            - name: BIGIP_USERNAME
              valueFrom:
                secretKeyRef:
                  key: username
                  name: bigip-login
            - name: BIGIP_PASSWORD
              valueFrom:
                secretKeyRef:
                  key: password
                  name: bigip-login
          image: f5networks/k8s-bigip-ctlr:latest
          imagePullPolicy: IfNotPresent
          name: k8s-bigip-ctlr
      dnsPolicy: ClusterFirst
      #imagePullSecrets:
      #  - name: f5-docker-images
Apply deployment manifest file for CIS. This will create a pod in kube-system namespace with replica of “1”.
kubectl apply -f f5-cis-deployment.yamlConfirm logs of CIS if any issues
kubectl logs <k8s-bigip-ctlr-###> -n kube-systemInstall the F5 CIS CRDs
kubectl apply -f https://raw.githubusercontent.com/F5Networks/k8s-bigip-ctlr/master/docs/config_examples/customResourceDefinitions/customresourcedefinitions.yml
Expose Application using F5 CIS
Create a VirtualServer custom resource (CR). The service parameter is the name of your application service that is of type “ClusterIP”
apiVersion: "cis.f5.com/v1"
kind: VirtualServer
metadata:
  name: f5-demo-mysite
  labels:
    f5cr: "true"
spec:
  host: mysite.f5demo.com
  virtualServerAddress: "10.192.75.113"
  pools:
  - monitor:
      interval: 20
      recv: ""
      send: /
      timeout: 31
      type: http
    path: /
    service: f5-demo
    servicePort: 80
Apply the VirtualServer CR. This will create a pod in kube-system namespace with replica of “1”.
kubectl apply -f vs-mysite-test.yamlConfirm the VirtualServer objects
kubectl get vsConfirm objects on BIG-IP
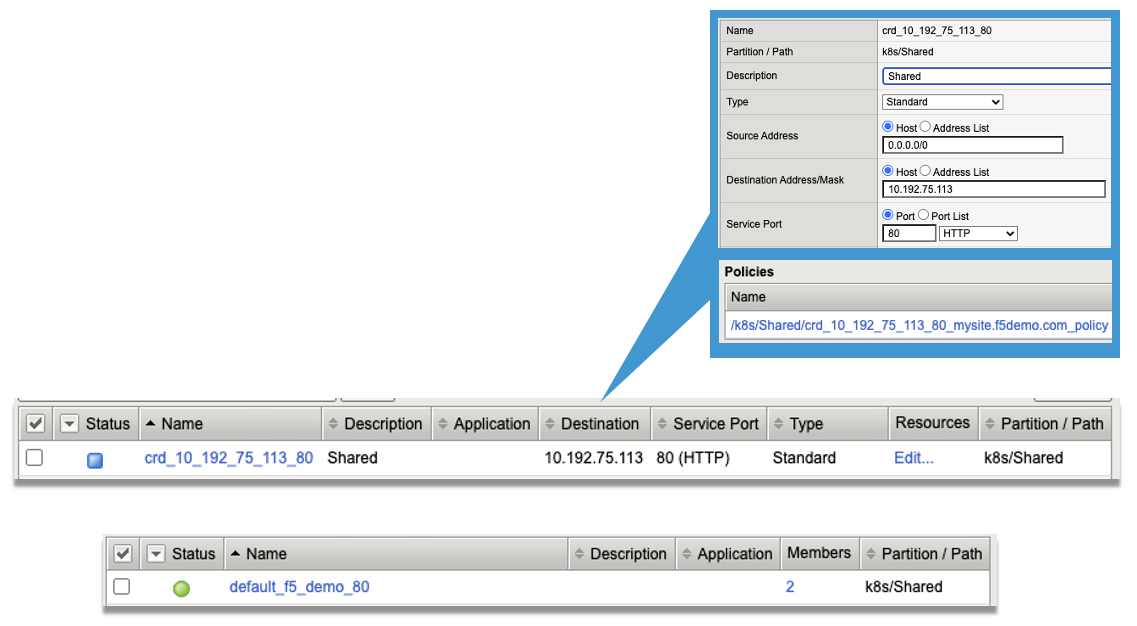
Confirm access from client to the exposed IP Address on BIG-IP.